Description: An informative post about what cache is, why it’s good to clear it, and how to clear your cache if you’re using Google Chrome as your browser. If this doesn’t interest you, try checking out some of my other posts and works.
What is “Cache”?
Cache, pronounced “cash”, is used to store data temporarily. Anytime you enter a website or click on a link through your browser, whether it be Safari, Google Chrome, Firefox, or some other, certain bits and pieces of that site are stored on your browser on the off chance that you enter that site again. If a companies browser is slow to load sites, then many of their users would switch to a browser that is faster and takes up less of their time, and then the company would lose the reason why businesses would pay to put their ads up on their browser in the first place. So, to make this quicker, the cache downloads and stores parts of every website you enter so that, should you want to enter that website again, the load time is much shorter, as the browser has that data already downloaded.
Why should you clear your cache?
While having your cache download and store info about the websites you visit so that they load faster next time, means that they can build up pretty fast. ZIPPA says that the average person visits 130 web pages each day. That’s 910 web pages per week and around 3,600 pages per month, it adds up, fast. All the data your cache is collecting to make the user the browser quicker eventually starts to slow it down more than simply having to wait for a large site to load. Clearing your cache regularly helps your browser run at its best, clearing room for it to start over and give you the best experience it can.
How do I clear my cache?
This how-to guide is specific for those who use Chrome as their main browser on their computer, so if you don’t have Chrome or need help clearing your cache on a different device, I suggest using this PDF. Before you start, make sure that you are signed into your Google account, this guide won’t make any sense if you are logged in as a Guest.
Step 1:
First, open your browser. If it opens automatically to a web page, I suggest opening a new tab to make things simpler.

Step 2:
Over on the right side of your screen, near the top where the button to close the browser is, you should see three small dots stacked on top of each other. Click it.

Step 3:
When you click on the three dots, a tab should appear from the side of your screen. Look towards the bottom of the tab and click the button that says “Settings.”

Step 4:
When you click on “Settings”, your blank tab should switch to the Google settings page. Over on the left side, you should see a row of options and different areas of your Google Settings. Click the third choice down from the top, “Privacy and Security.”

Step 5:
Once you click on “Privacy and Security”, your screen should look similar to the following image below. You should see a button in the middle of your screen that says “Clear Browsing Data.” Click it.
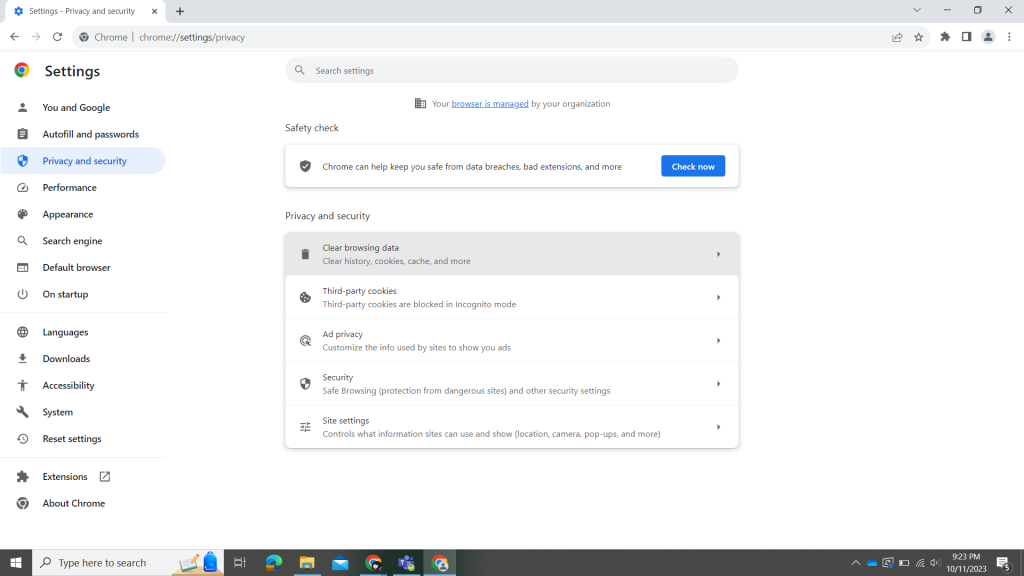
Step 6:
A box should appear. There are a few different options there, but the one we are concerned with is at the bottom, “Cached images and files.”

Step 7:
Now, by checking the box and clicking the blue button at the bottom corner, you have successfully cleared your cache.
Key Takeaways
Remember:
- The cache is used to store data temporarily.
- The cache downloads and stores parts of every website you enter so that, should you want to enter that website again, the load time is much shorter, as the browser has that data already downloaded.
- While clearing your cache may cause some sites to load slower initially, overall, it’s the best thing to do so your browser runs smoother.